How to add push notification in WordPress

21.05.2019

We will discuss how to integrate Push notifications on a WordPress website, here. In the previous blogs, we have covered the basics of Web Push notifications - what are Web Push notifications, how does a Web Push notification work- its protocol, difference between Push notifications and Pop-up notification, why Push Notifications, advantages of adding Push notifications on a website. Later, we got to know about the "Top 3 Push Notifications service providers & comparative chart".

  • 15 Steps to setup Push Notifications to a WordPress site in just 15 minutes:
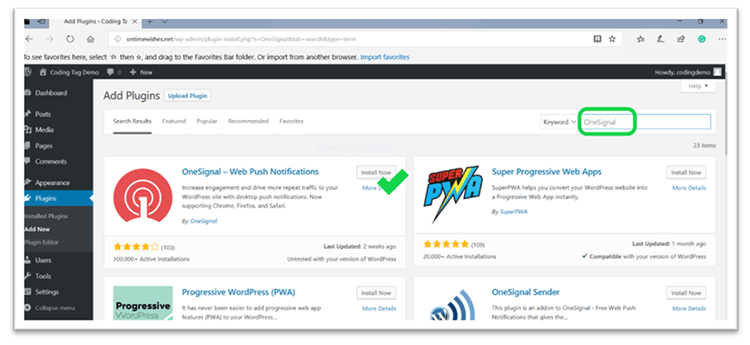
  • Let us now walk through the fifteen installation steps and configure web push notifications on a WordPress site with the help of a free and simple, reliable and high volume push notification service- "OneSignal" plugin, simultaneously. OneSignal works with Web Push platforms such as Google Chrome, Firefox, Safari.

  • All set! Let's begin...

    1. Login with Admin credentials to the WordPress site,

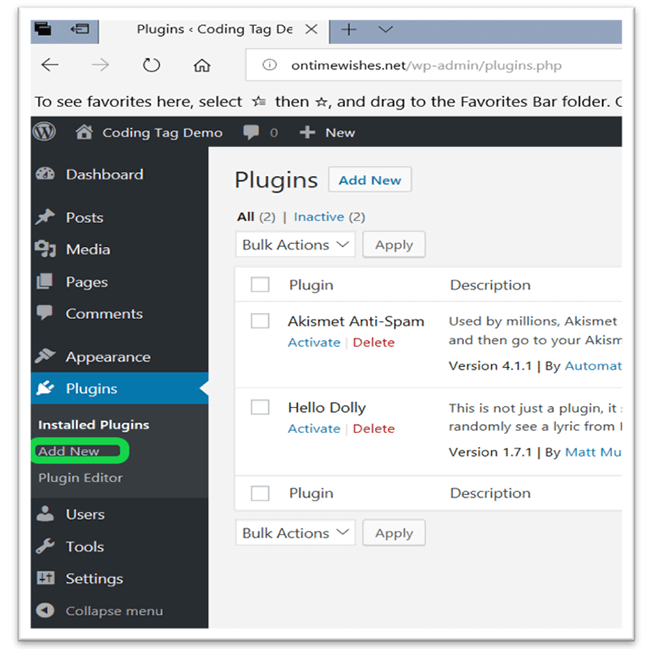
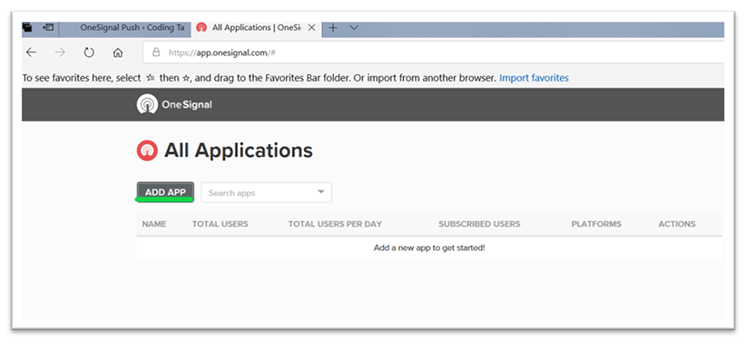
    2. Go to the dashboard, under Plugin menu item select "Add New".
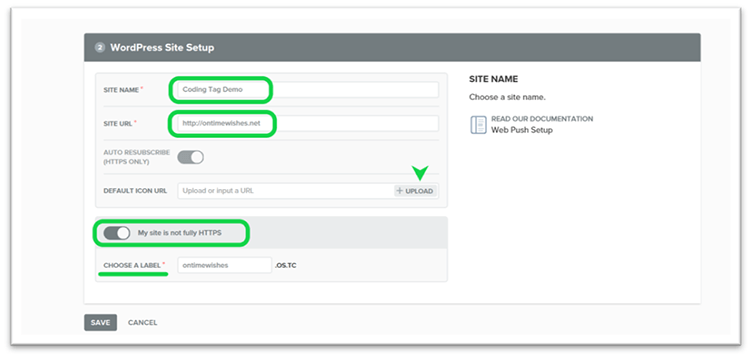
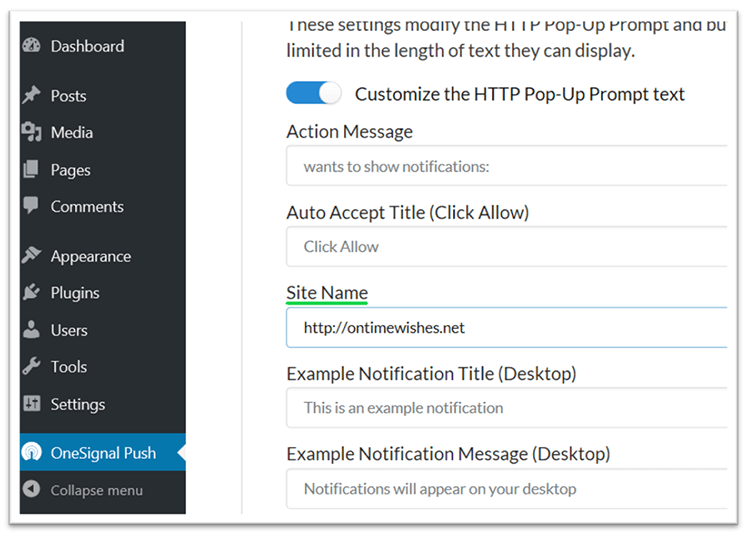
  • Source : Coding Tag

  • 3. Under the Search bar, search "OneSignal" plugin and click on "Install Now". Later, press "Activate" tab that shows up after clicking "Install Now".
  • Source : Coding Tag

  • 4. After activation, OneSignal Push Notifications gets listed under Plugin with other plugins (as highlighted). You can also locate this plugin on the admin dashboard.
  • Source : Coding Tag

  • 5. When you click on the "OneSignal Push" under the dashboard menu, the settings page shows two tabs- "Setup" & "Configuration" and a message asking for App ID and API key for the plugin settings.
  • Source : Coding Tag

  • 6. For the necessary settings, App ID and API key, open a new tab on the same browser, then type in OneSignal.com (the company that offers the push notification service), create a free account using "Get Free Account".
  • Source : Coding Tag

  • 7. After successful account creation on OneSignal Push and logging in with the credentials, select "Add App" tab.
  • Source : Coding Tag

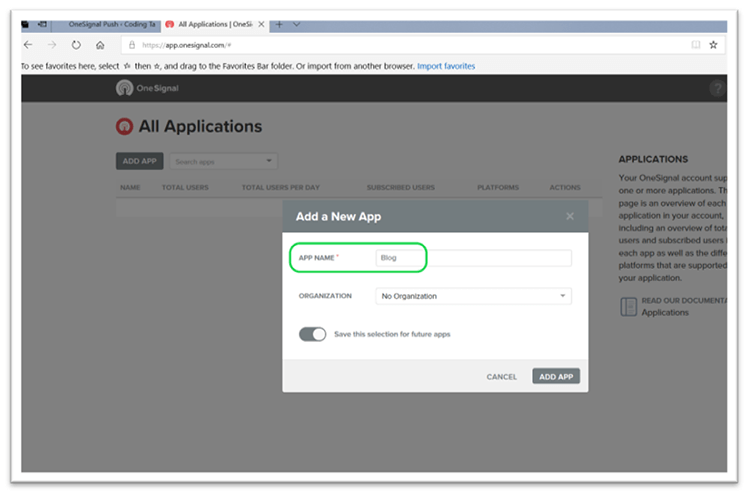
    "Add App" then prompts a window to enter App Name.

    Source : Coding Tag

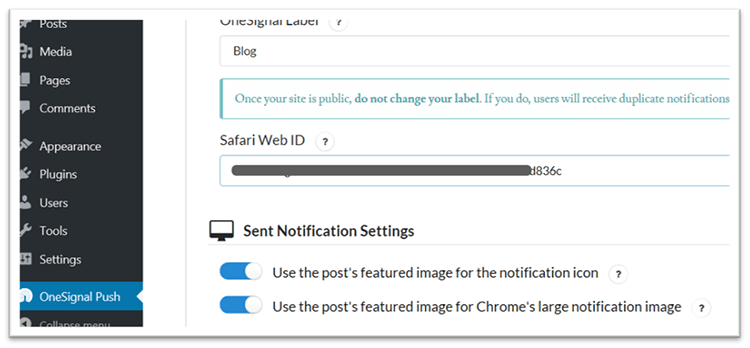
    For this tutorial, we have given the app name "Blog" as you can see in the image. Next, added this new app.

  • 8. Now, we get another window to edit the added app ("Blog" the name of the app in this tutorial reference). Here, you get to choose the platform on which you want to configure the settings (whether Apple iOS, Google Android, Web Push, Amazon Fire, Windows, Mac-OS, Chrome Apps & Extensions). As we are configuring for 'Web Push' notifications, we select that and click on the "Next" button to continue.
  • Source : Coding Tag

  • 9. After clicking "Next", you get a webpage "Configure Web Push", where you click on 'WordPress Plugin or Website Builder' box and also, select WordPress.
  • Source : Coding Tag

  • 10. Scroll down on the same page; you get to see a 'WordPress Site Setup' section. Here, you need to enter the website name, website URL, and upload logo (or choose to use the default icon). This logo is a final one that appears as a notification icon on the website. Just below this section, you get a toggle button to switch if the entered website has HTTP or HTTPS protocol. As already mentioned, web push notifications are sent from a secured HTTPS URL only. If your WordPress site doesn't use HTTPS, then you need to turn this setting on and choose a label. A label is a subdomain hosted on OneSignal servers using a secure HTTPS protocol. This subdomain will be used to send push notifications to the end users.

    In our example, the website URL Coding Tag Demo doesn't use an HTTPS protocol, so we have toggled "My site is not fully HTTPS" on. Then, we have entered a label (a subdomain from OneSignal that would send pushed notifications to end users). Now, "Save" this setup.
  • Source : Coding Tag

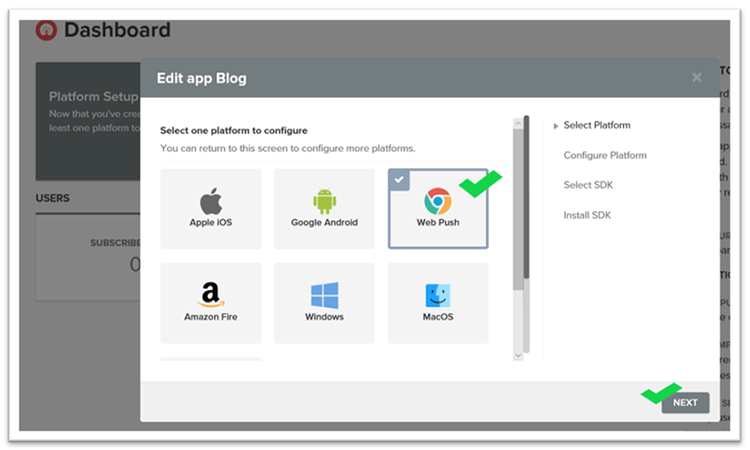
    Recommendations from Coding Tag: Use the logo of your company/business by providing directory location of the logo because this gives a professional look and feel on the website to the end user. As we were using a dummy website to demonstrate the installation steps, so we continued with the default one.

  • 11. After saving the above setup, we get the App ID and API Key which was asked in the step (5).
  • Source : Coding Tag

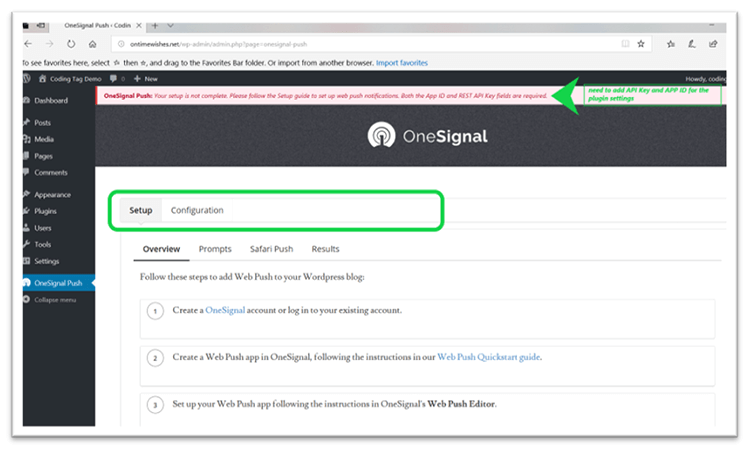
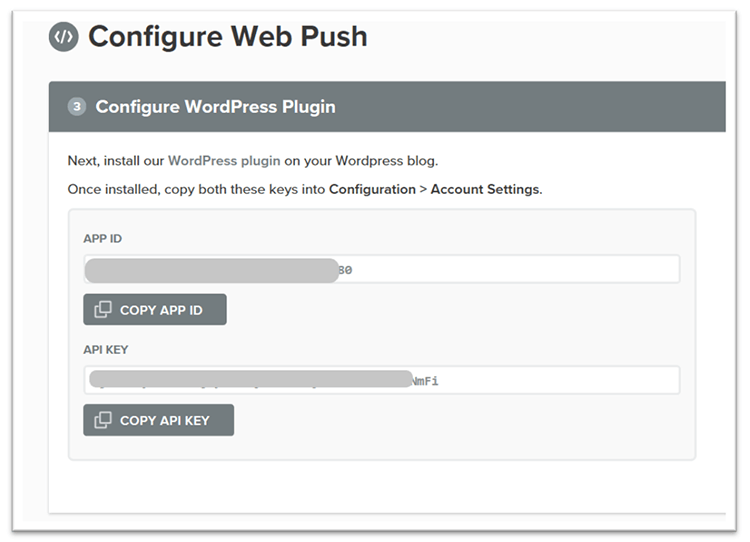
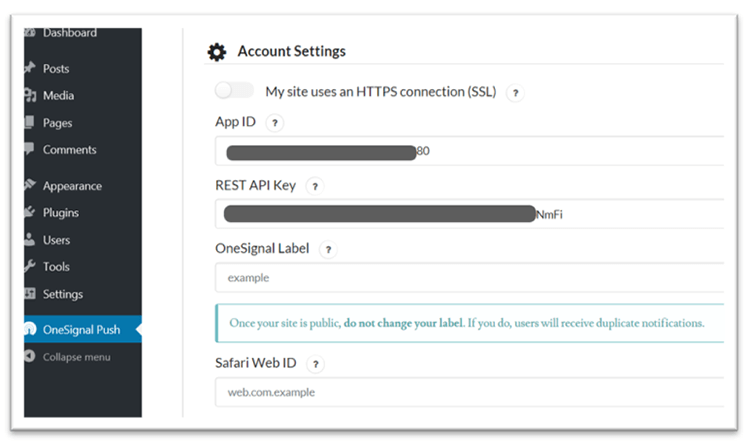
    Copy these App ID and API Key and paste them. Now, come back to OneSignal plugin settings on your WordPress site and go to the 'Configuration' tab. Paste the APP and API keys in their respective text-boxes.

    Source : Coding Tag

  • 12. Under Label, enter the app name you had given while adding the new app. In our tutorial, we had entered "Blog", so we would continue with that. For "Safari Web Id", we need to switch back to OneSignal website and go to the settings page for the Safari Web Id.
  • Source : Coding Tag

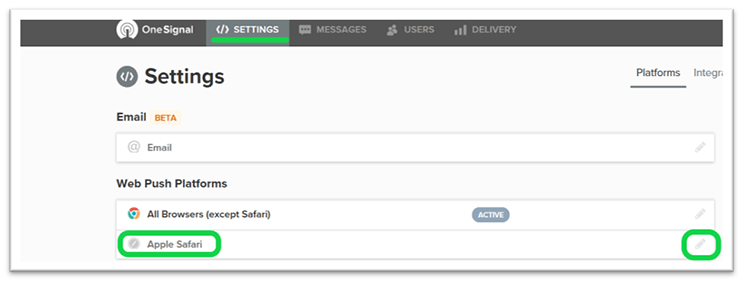
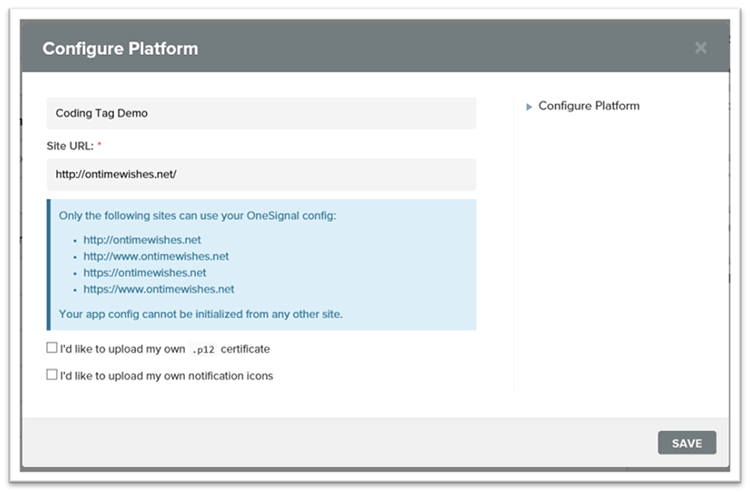
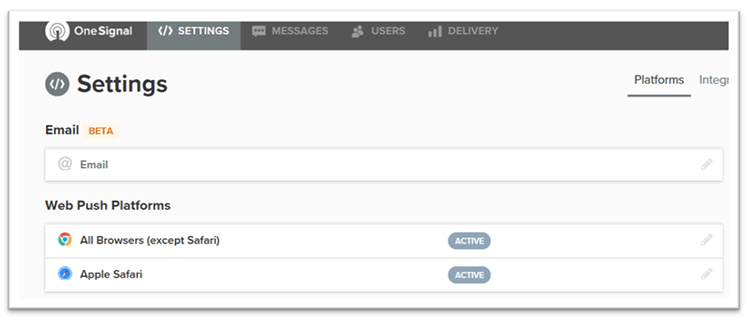
    Select "edit (pencil)" icon near Apple Safari under "Web Push Platforms".

  • 13. Now, enter the URL of the website and select the icon representation that you had chosen in step (10). We preferred the default one so we have not tick-marked any options.
  • Source : Coding Tag

    Then, click "Save" to proceed. After saving, the setup is active for all Chrome browsers and Safari browsers

    Source : Coding Tag

  • 14. Take the Safari Web Id by clicking "Edit (pencil)" icon,
  • Source : Coding Tag

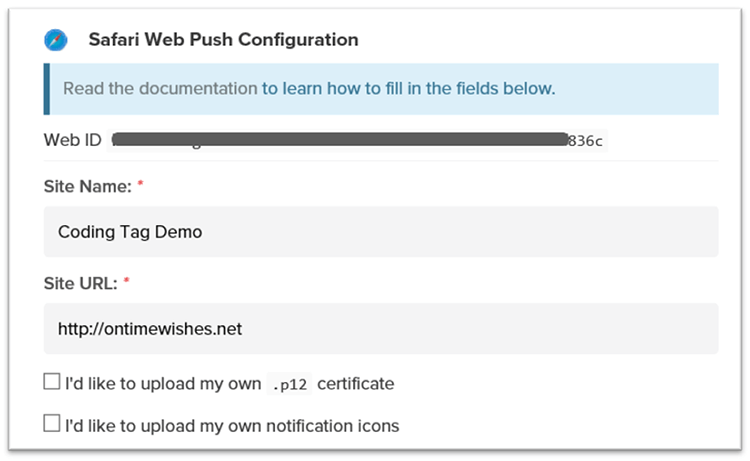
    now, paste it on the plugin configuration setting on the WordPress site, against Safari Web Id.

    Source : Coding Tag

  • 15. Scroll down in the same plugin settings page on your WordPress site and enter the URL of your site.
  • Source : Coding Tag

    Now, enter the "Save" button. Visit the site on which these settings got configured. Click refresh or Ctrl+F5. A small notification window appears on the site.

    Source : Coding Tag

      Hey, Congratulations! It's done! Pat your back! :)

      We trust that this blog was helpful. If you've liked the blog, then please subscribe to our website to receive the pdf on "Beginner's Guide to Web Push Notification 2019 & How to Add Web Push Notification in WordPress?" which we would be launching soon.

      Re-engage. Retain. Re-target.

    Read Blog At Coding Tag